Types of Pressure Canners
This page may contain affiliate links. More Information.
When it comes to pressure canners, there are two primary types: weighted gauge and dial gauge. They both do the same job of managing pressure during processing, but they achieve it through different mechanisms.
- Weighted gauge canners rely on a weight to monitor pressure.
- Dial gauge canners have dial for monitoring pressure.
In this article, we are going to look at the differences and similarities between these two main types of pressure canners. So you can choose the one best for you. (hint… they both work well!)
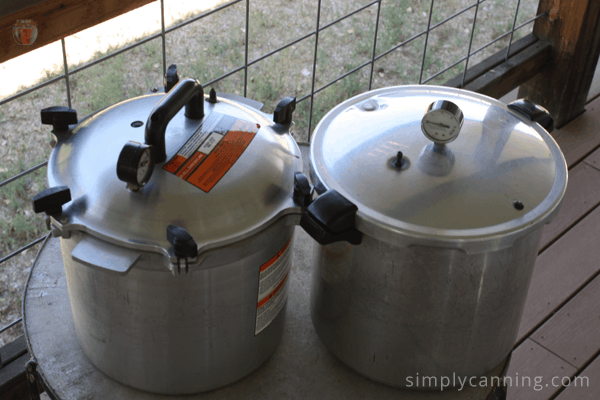
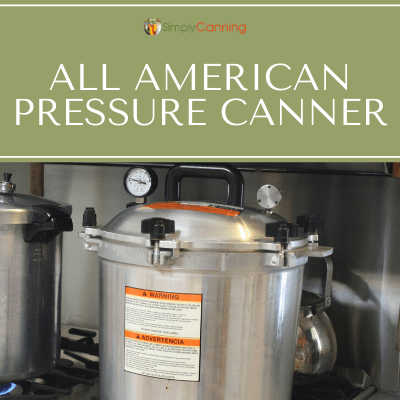
The All American on the left does have a dial, however you use it as a weighted gauge.
The Presto Canner on the right is a dial gauge canner.
What is the Best Pressure Canner to Buy?
I get this question quite often. So I’m including my recommendations here first for those who just want a recommendation. Then I’ll get to the details on each type of pressure canner.
The All American Pressure Canner, the Presto Pressure Canner, and the Mirro Pressure Canner are the three main brands of pressure canners. Any one of them will work.
I would recommend either the All American or the Presto, with the Presto being best for a new canner who might be intimidated. Many people have Mirro and seem to be satisfied; I just don’t have any personal experience with them myself.

Dial or Weighted Gauge Pressure Canner?
There are two types of pressure canners: the dial gauge and the weighted gauge. Both perform the same task, only in slightly different manners.
The difference is the way they measure pressure. One uses a dial gauge, while the other uses weights to measure the amount of pressure buildup. When you’ve reached the desired pressure, you will manually adjust the heat to either maintain the dial in the correct position, or keep the weights at a moderate jiggle.
Parts of a Pressure Canner & How They Work
The style of pressure canner you choose is simply personal choice. Let’s go over the parts of a canner and how they are different on the different styles.
The Pot for Either Canner Style is Basically the Same
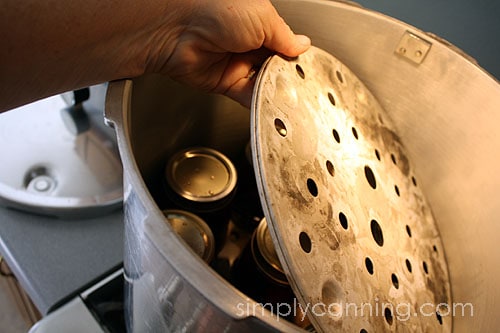
Both weighted gauge and dial gauge pressure canners will have a base pot and a jar rack. The pot for either canner style is basically the same. It is a deep pot with a way for the lid to latch on. (See canning lid below for more on that.)

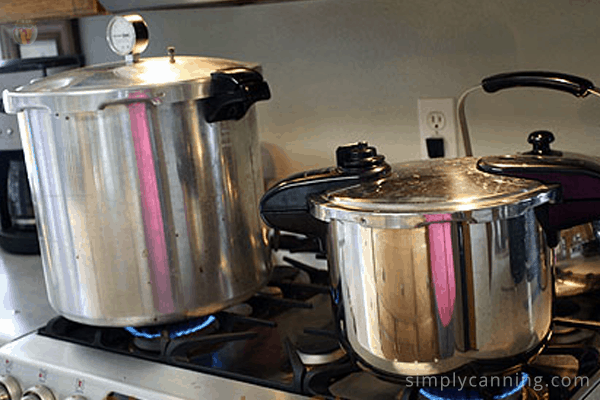
In this photo, my older dial gauge Presto is on the left, and the new weighted gauge Presto is on the right. I was surprised at the difference in size. Both canners hold seven 1-quart jars. However, my old pot is a bit narrower and taller than the new one. The jars fit more comfortably in the newer one with more room around them, but the older style has more head room above the jars. Neither pot is better than the other, just different.
Some pots will be deep enough that you can stack jars. Yes! Stacking jars is acceptable and a great way to get more done all at once.
Pressure Canner Rack
Unlike the rack of a water bath canner, the pressure canner rack does not hang on the sides of your canner. The rack is fairly flat but is raised just enough to keep the jars off the bottom of the pot. It also has holes to allow water to flow. You’ll also use a second rack between layers if you’ve got a canner that is tall enough to stack jars.
The Lid
This is where the different types of canners start to vary. Both styles have similar lids. However, after closer inspection, we see a few differences.
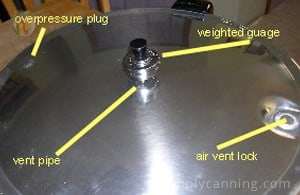
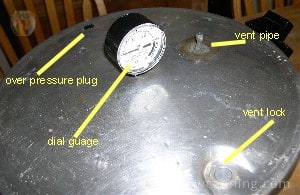
Overpressure Plug
This little black rubber plug is the safety net. If the pressure inside ever gets too high because of plugged vents, this plug will pop open and release pressure. It is designed to send steam and pressure straight up in the air. It will be loud and may startle you, but the canner will not explode. A good thing, eh?! Both canners have a rubber overpressure plug.
Air Vent Lock
This opening allows air to vent or exhaust at the beginning of your processing time. As pressure begins to build, the lock comes up and seals the opening. This vent lock is also a safety device that prevents us from accidentally opening the lid when pressure remains in the canner. It is a fail-safe, because it is IMPOSSIBLE to take that lid off until the pressure drops.
When the vent lock closes, steam continues to stream out of the vent pipe. You should allow this steam to escape for the complete venting time recommended in your directions, usually 10 minutes. See the step-by-step directions for more details on how to monitor the canner during heating up.
Vent Pipe
- On the weighted gauge, the weights sit on the vent pipe. You rely on the weights to monitor your pressure. You’ll have different weights for either 5, 10. or 15 pounds of pressure. More on the weights below.
- On the dial gauge, a single counter-weight sits on the vent pipe. You’ll notice this is separate from where the dial sits. You rely on the dial to monitor your pressure
Before each use, check the steam vent openings to be sure they are clear. You can visually check and/or run a string through the openings to clear out any obstructions.
Weights
Weights are different for each style of canner as well. When the chosen pressure has been achieved, the weight will begin to rock. This indicates that the desired pressure has been reached.
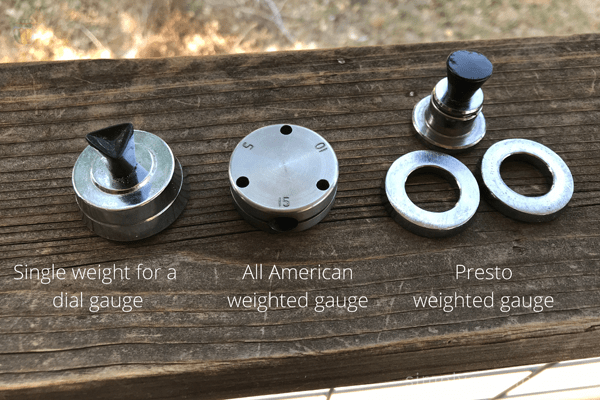
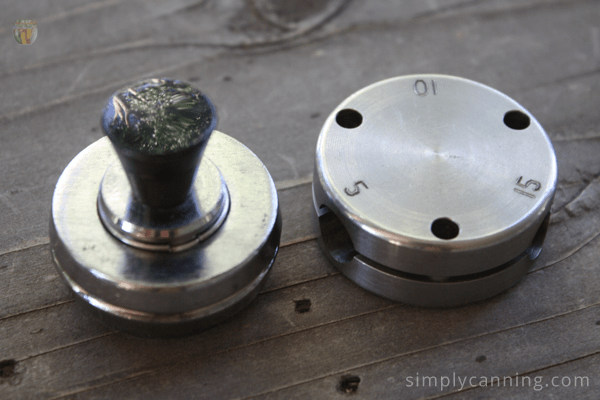
Weight for a Dial Gauge Pressure Canner
In this case the “weight” is really a one-piece counterweight. It is used to close off the vent, so pressure can build. It does not determine the amount of pressure buildup. You will watch the dial to determine when the required pressure has been achieved, and then adjust your heat level to maintain the level on the dial. The weight does not rock.
Weight for a Weighted Gauge Pressure Canner
With a weighted gauge, you are limited to 5, 10, or 15 pounds pressure. You do not rely on a dial. You will choose your own weight according to your altitude. You will choose a weight of: 5, 10, or 15 pounds. Your recipe should tell you what pressure you need. When the weight begins to rock or jiggle tells you that you are at pressure. You again adjust your heat level to maintain a gentle rocking motion.
Check this page for more on how to know what weight you’ll need for your altitude.
The style of weights that I show here on the right consists of the base and metal rings. This is what comes with a Presto pressure canner. The base and plastic tip without the rings will indicate 5 pounds of pressure, the base with one ring will indicate 10 pounds of pressure, and the base with two rings will indicate 15 pounds of pressure. Add rings according to your required pressure.
This style of weight on the left is what comes with an All American Canner. It is one piece and you choose your pressure by putting the weight on your canner at the right hole. 5, 10, or 15 pounds is written on the side of the weight. Even though the All American canner has a dial…you don’t rely on that dial, you go with the weights. I know; confusing, huh? The AA company has designed this with a dial for an estimate, but we are to rely on the rattle of the weight to determine the proper amount of pressure.
Sealing Ring or Gasket
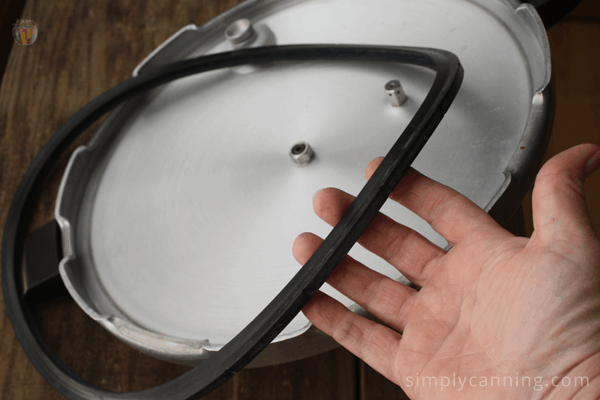
Presto and Mirro pressure canners both have a rubber sealing ring inside the rim. This gasket provides an airtight seal that allows pressure to build.
If you find you are loosing pressure and steam is leaking around the lid, this gasket is the culprit. Though they do last for years, it will need to be changed occasionally. Each year, make sure the gasket is flexible and not cracked. If there is any doubt, go ahead and check it before you have a load of food to process.
To do this, simply fill your canner with 3 inches of water and bring to a boil. Place your lid and weights and let the canner build up a little pressure. As soon as you can see that the gasket is working and no steam is leaking around the edge of the lid, turn the heat off and let the canner cool. Do not lift off the weights or try to open the lid until the canner has come back to zero pressure.
The All American pressure canner does not have a rubber gasket. The lids are made to clamp down tightly enough that a seal is not needed. It is recommended that you lubricate the lid with oil occasionally. Specific directions will be included with the care and maintenance manual.
Is There a Difference Between a Pressure Cooker and a Pressure Canner?
Yes! There is actually a big difference between a pressure cooker and a pressure canner. You can read more at the link below, but basically, you can cook with a canner, but you can’t can with a cooker.
Pressure cooker on the right.
Pressure Cooker or Pressure Canner?
Some manufacturers will call their pot a cooker/canner, which adds to the confusion and mixing the two up. Remember low-acid foods (meats, vegetables) do require a pressure canner.
In order to be acceptable for using in processing jars, your canner should be able to hold 4 quart jars, it should have a way of venting, and it should have a mechanism to accurately measure the pressure. Many cookers do not meet those requirements.
Warning – You will see smaller pressure cooker/canners advertised on the market for home food preservation. These canners have not been tested with current canning recipes and instruction.
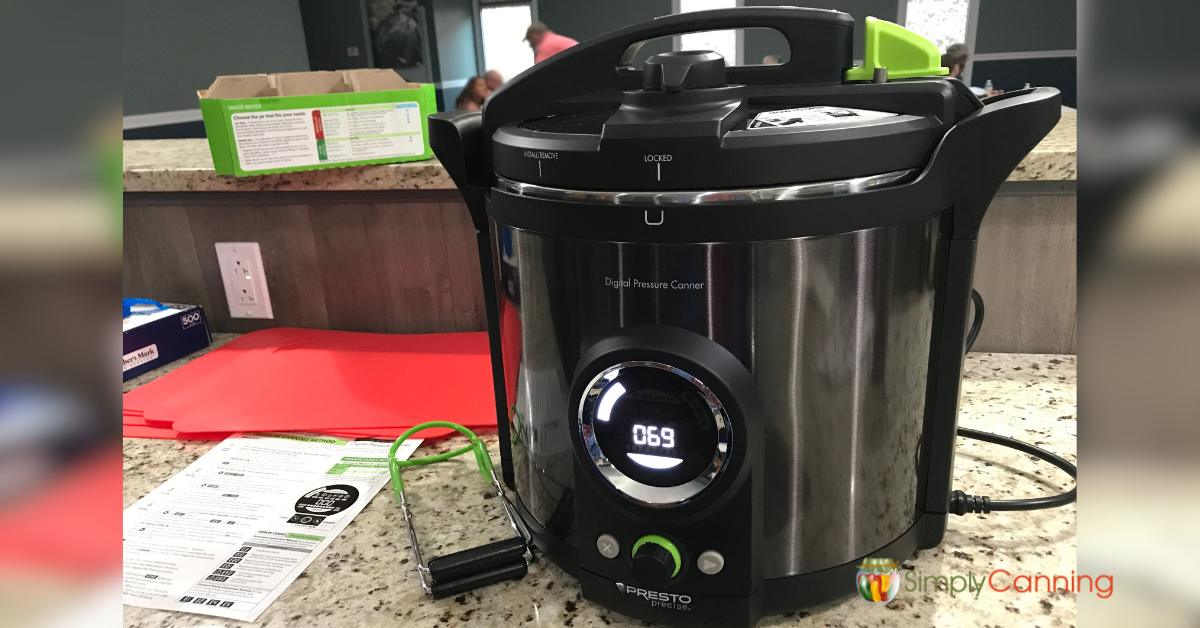
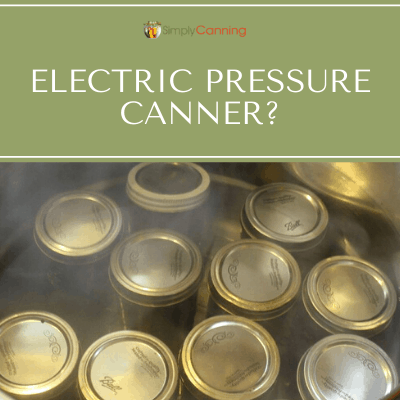
What about an Electric Pressure Canner?
Presto has recently come out with an electric pressure canner. These work differently that either the weighted or dial guage canners. They focus on actually measuring temperature. I’ll let you read more about the Presto Electric Canner here.
How to Use a Pressure Canner
The link below leads to step by step directions for using your pressure canner. This tutorial goes step-by-step with pictures to guide you through the whole process, from filling your jars to storing them on a shelf.
Click here for step-by-step Pressure Canning Instruction.
Some Things to Remember About Using a Pressure Canner
- A dial gauge must be checked for accuracy. It is recommended that this be done once a year just prior to your main canning season. Extension services usually do this for a minimal fee. You might also check with other local stores that carry canning supplies. For instance, our local Ace Hardware often has canner testing available for a small fee one weekend each year.
- A weighted gauge is limited to 5, 10, or 15 pounds of pressure. If your required pressure differs from these, choose the next higher level. For example, if your required pressure is 13 pounds, you should use the 15-pound weight.
- Remember, before each use, check the vent openings on your canner lid to be sure they are clear. Visually check or run a string through the openings to clear out any obstructions. If vents get plugged, the canners pressure will get too high and the overpressure plug will blow. Simply check the vents each time you process something and you should never have an explosion in your kitchen.
Related Pages
Lose the fear about pressure canning and educate yourself on the different brands available, safety features, and how they work with the help of SimplyCanning.com
Canning in a Pressure Cooker – Is It Safe? This is a common question at SimplyCanning.com. Dive into the differences of a pressure cooker vs. pressure canner and make an educated decision before trying it!
Botulism is food poisoning caused by improper processing and handling. Thankfully, it’s very easy to avoid it with some common sense and best practices.
I started pressure canning in my 60’s when my husband bought me one for Christmas. I was always afraid to try them. It took me quite awhile to get enough courage to try it. As a kid I was always warned to stay away from the stove because that thing can kill you. I have the Presto and have been very happy with it.