Jerky Blaster Review: Making Ground Venison Jerky at Home
This page may contain affiliate links. More Information.
Homemade ground venison jerky! 🦌 Our Jerky Blaster makes it super easy to make your own homemade deer jerky. A jerky shooter makes forming the strips easy. 😋
Link Mentioned in the Video:
We used the Jerky Blaster, but there are many different styles & brands available.
Making Ground jerky basics
We make ground venison jerky using a Jerky Blaster (sometimes called a jerky shooter). It’s an easy, and mess-minimizing way to turn your ground meat into delicious homemade jerky. (because making jerky is messy) Kind of like a caulking gun!
My husband Tim makes both ground and sliced jerky from venison most years. We’ve had this jerky blaster for many years. It holds up well. And makes it very easy to create meat strips.
Here is what we do.
Step 1: Preparing the Venison
For this batch, We used straight ground venison — no pork or beef mixed in. I used a jerky cure and seasoning mix.
Hi Mountain is the brand of seasoning we use. You can get it at Amazon here. It has all the ingredients needed to cure and season jerky.
The directions on the package say to add water, but we’ve tried it both with and without water. In our opinion it’s just as easy to mix it in without adding water. It probably mixes in easer with the water… but It dries faster in the dehydrator, and the texture turns out great without adding water.
If you opt to leave out the water just be sure and mix thoroughly.
Once Tim mixes in the seasoning thoroughly into the meat, He covers the bowl with plastic wrap and lets it rest in the fridge overnight. Sometimes even for two or three nights if life is busy — that extra time doesn’t hurt.
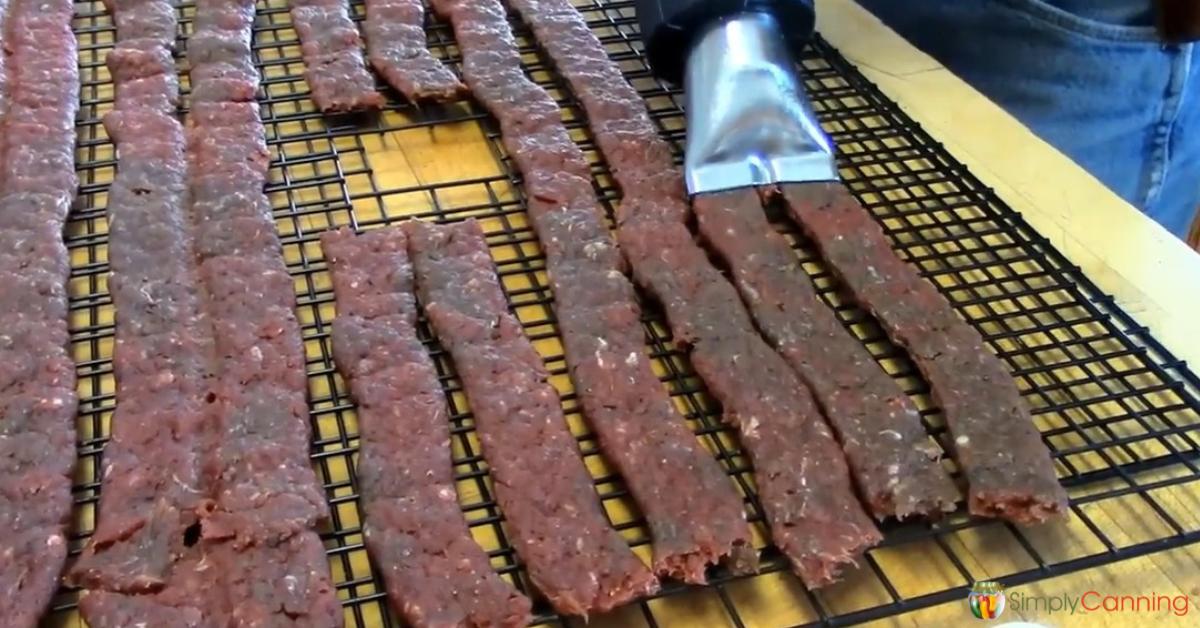
Step 2: Using the Jerky Blaster
The real star of this article is, of course, the blaster itself. My husband and I bought ours a years ago, and we’ve used it a lot. It makes laying out jerky strips so much faster and less messy.
Tim’s got a tip for filling the tube.
- Roll the seasoned meat into small, round balls — about the size of a meatball.
- Then drop them into the Jerky Blaster tube. This makes it easier to load.
- Then pump out nice, even strips directly onto the dehydrator racks.
We use the larger Jerky Blaster. It’s strong enough to handle our thicker venison even without water. If you have a smaller shooter, you might want to test a small batch first just to make sure it can handle it.
Step 3: Getting Every Last Bit
Here’s another little trick Tim uses for getting the last bit of meat out of the Jerky Blaster tip — Shove in a couple of pieces of bread. Totally optional. But it works for us.
Take two slices of homemade bread (a major sacrifice around here!) and feed them through the tube like you would the meat. The bread pushes out the remaining venison so nothing goes to waste. (Well, except for the bread)
Step 4: Drying the Jerky
Once all the racks are filled, we set them in our dehydrator set to 160°F for two hours. After that, I flip the jerky strips and keep drying, checking every couple of hours until it’s done. This flipping help the strips to not stick to the trays when the jerky is done.
You’ll know it’s ready when it’s:
- Fully dry but not crispy
- Slightly “bendy” — it should bend before breaking, not crumble apart.
- “Leathery” is another good descriptive word.
- There should be no pockets of moisture. Check the thickest parts of the thickest pieces.
That leathery texture is perfect. It means the jerky is dry enough to store but still chewy when you eat it.
Step 5: Cleanup and Storage
When everything’s drying, I like to clean up the counters with a little scraper tool. It works much better than a rag for getting up small bits of meat. Then scrup well with hot soapy water. Use a scrub brush to make sure it is very clean.
Once the jerky is finished, I store it in a bread-sized Tupperware container in the fridge.
It makes a great snack, and in my house, it doesn’t last long — the boys always grab it before I even realize it’s there!
How to Make Jerky: A few safety tips
Either ground or sliced Jerky must be heated to an internal temperature of 160. We dry our jerky at 160 degrees. But I’ve seen 140 degrees recommended.
If you choose to dry it at a lower temperature, you need to make sure that 160 degrees is reached at some point. This can be done either before or after dehydrating.
- Before dehydrating: use a liquid marinade and bring to a boil for 5 minutes after marinading time. Drain and continue with dehydrating.
- After dehydrating: Place your dried jerky on a cookie sheet. Heat for 10 minutes in an oven that is pre-heated to 275 degrees. This seems much easier in my opinion.
Jerky Blaster Review
If you’re thinking about making ground venison jerky at home, I highly recommend the Jerky Blaster or a tool like it. It’s sturdy, simple to use, and makes even strips that dry evenly every time.
- It cuts down on mess
- It handles thick meat mixes without needing added water
- It’s fun and easy to use
Honestly, if you’re looking for a great gift for your husband (or yourself!), this tool is perfect. Once you try making homemade jerky with it, you’ll never go back to doing it by hand.