Canning Dried Beans
This page may contain affiliate links. More Information.
First things first. If you are canning dried beans you MUST process them in a pressure canner.
How to can dried beans is just below. Click here for directions on using a pressure canner.
You’ll need about 3/4 pound of dried beans per quart jar. Follow the instructions below, you are soaking the beans, then partially cooking them before putting them in the jars.


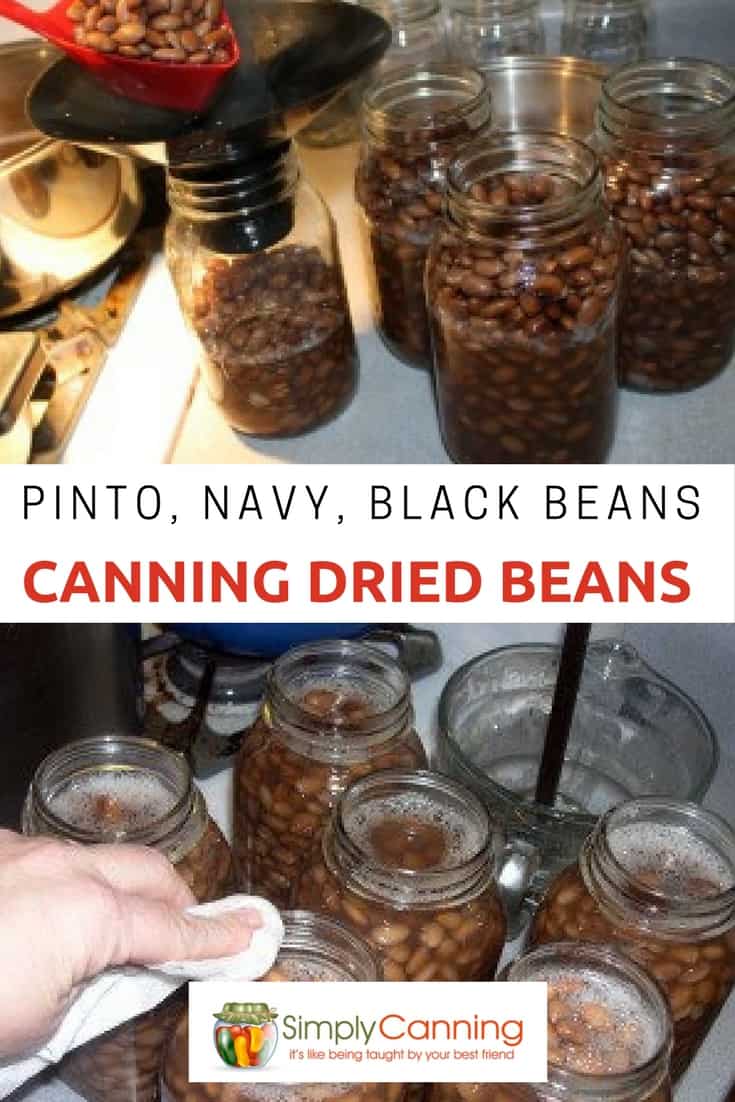
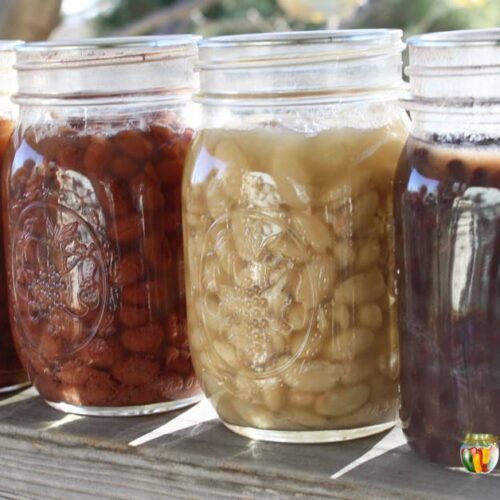
On this page, You’ll probably notice my images have several types of beans, pinto, black and northern. I can dried beans often and I just pulled from images I’ve taken at different canning sessions. In fact, I often will prepare a couple of types of beans and do a few jars of each in one canning session. They all have the same processing time.
When I say canning dried beans… I mean northern, pinto, navy, black…… Not green beans. The dried beans are cooked and pressure canned in liquid. Not canned dry in a jar.
Hope that clears it up!

Why is canning dried beans a good idea?
Beans are so easy to store in their dried state that it is easy to just leave them there and use dry. If you are looking at long term storage, don’t can your beans. Dry beans will store much much longer dry, vs wet like these directions.
But how many times have you wished you had thought to soak your beans ahead of time so you could make chili? I’ve done it often! Precooked jars of home-canned beans on the shelf is great convenience food. Canning dried beans yourself is so easy it makes no sense to purchase canned dry beans from the store. The cost savings are huge!
Recommended shelf life is one year. After that, the nutritional value goes down. It is not intended for long term storage. Just short term storage and convenience.
A reader sent in another good reason for having beans already canned (er jarred). Dirk says……. “You mentioned this if for convenience, but there is one other reason; It takes a LOT of water to cook beans no matter what method you use. If you are canning for rough times, water my be in short supply. By having a good supply of beans already processed and in jars ready to heat and serve you will not use ANY water at all.”
I also did a video on why you should can dried beans here.
How to soak your beans for canning.
The first thing you will need to do is soak your beans. There are 2 methods for this. Overnight soak or quick soak.
Overnight soak
Check your beans for any small bits of rock, dirt or bad beans. Place dried beans in a large pot and cover with water. Adding a little acid in the form of vinegar or lemon juice is a good way to improve the nutritional value of your beans. Add about 2 Tablespoons or so. I usually just splash a dob in. How’s that for measurments? A “dob”
Soak 12 to 18 hours in a cool place. I usually do this overnight. Drain water.
Quick Soak
If you don’t want to wait over night you can quickly hydrate beans. Simply cover sorted and washed beans with boiling water in a saucepan. Boil 2 minutes, remove from heat, soak 1 hour and drain.
How to Can dry beans.
Gather Your Canning Supplies
- pressure canner
- canning jars
- canning lids and rings
- jar lifter and canning funnel
- large pot
- large spoons
- towels and dish cloths
Ingredients
- dried beans of your choice
- canning salt
Next prepare your jars and start preheating water in your canner. The goal is to have the canner hot but not necessarily boiling when the jars are ready to go in.
(see pressure canning for more specific directions)
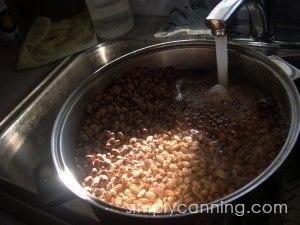
Rinse your presoaked beans. Using a colander is the easiest method. This rinsing is important as it removes all the soaking water from the beans. Discard any water from the soaking step you don’t want to reuse.

Place the beans back in the pot and recover with fresh water. Bring them to a boil reduce heat and keep them at a low boil for 30 minutes. Now you are ready to fill your jars.
Add 1/2 teaspoon of salt per pint or 1 teaspoon per quart jar, if desired. Salt is optional but I highly recommend it.
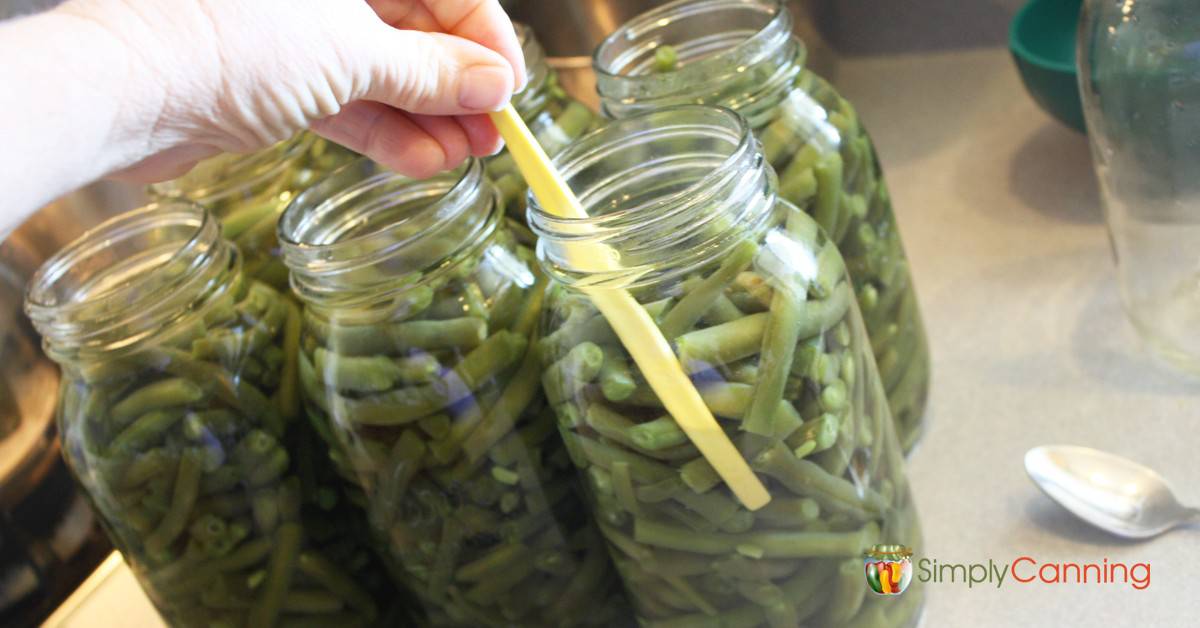
Fill jars with beans leaving a generous 1-inch headspace. A little more is even ok. Beans will tend to soak up more water as they process so leaving a little extra room for more water is fine.
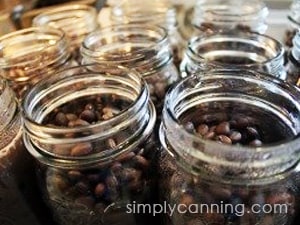
Next you’ll want to add your hot water. You can reuse the cooking water or use fresh boiling water. I tend to use fresh water that I’ve heated up in my tea kettle. It makes it super easy to fill each jar without ladles. Much neater.
It is important that the liquid you add does come up to the proper 1-inch headspace. The beans will be fully covered.
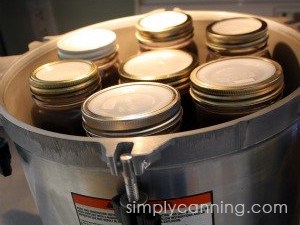
Next you want to clean off the rims of your jar with a damp dish rag or paper towel. This is so there is no food residue to interfere with the seal of the lid.
Place the canning lids and screw bands on your jars and place them in your preheated pressure canner.
When all your jars are filled you are ready to process.
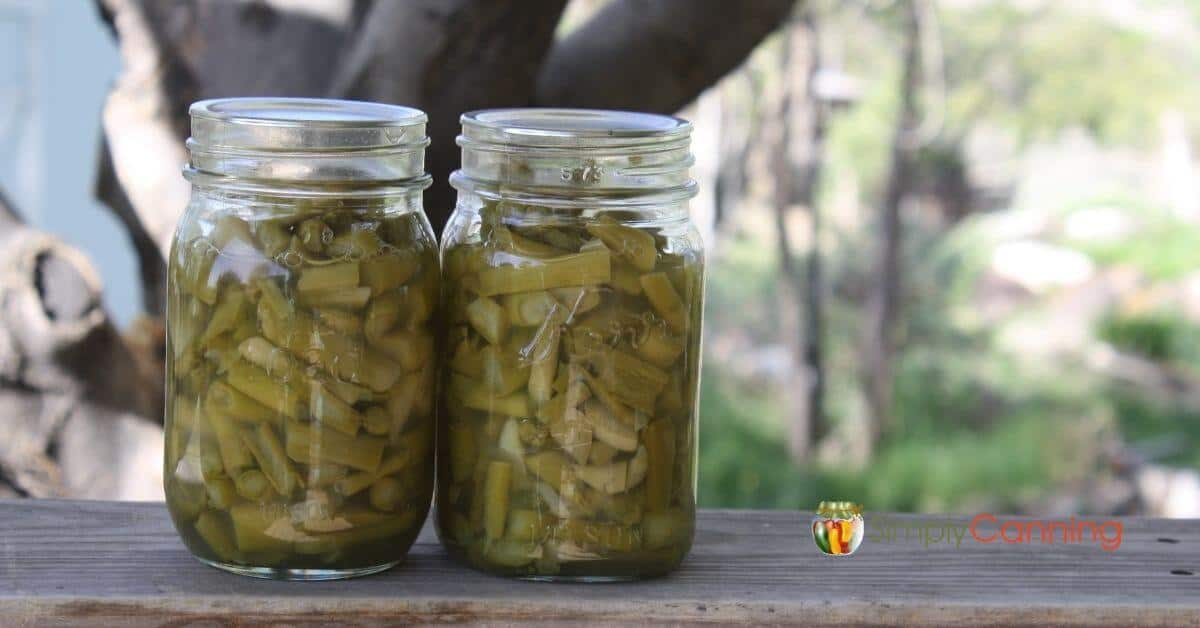
This day I’m doing pints. I have double stacked 15 pints in my All American Canner.
Canning Dried Beans Processing
Remember you MUST use a pressure canner. Canning dried beans with a water bath canner is NOT safe. If you are not familiar with how to use a pressure canner check out this page…
Processing times.
pints – 1 hour, 15 minutes
quarts – 1 hour, 30 minutes
Be sure to adjust processing according to your altitude. For more information see this altitude adjustments page.
A few important questions regarding canning dried beans
Why presoaking Dried Beans is Essential For Safe Canning
I get messages from folks who use a different method for canning dried beans. They use a raw pack method measuring out dry beans directly into the jar, add water and process them that way. Just remember, time in the canner has not been tested from the dried state. Dried beans are far different from fully rehydrated beans.
Dry does not conduct heat as easily as moist. I heard this illustration – think about how you can put your hand in a hot oven for a moment without getting burned, but you’d never do the same with boiling water.
When canning, the beans need to be fully hydrated before the heat can penetrate them effectively. If you start with dry beans, most of the processing time is spent just hydrating the beans, rather than actually cooking them at the high temperature needed for safe preservation. This can result in under-processed beans, which pose a serious risk of botulism.
My suggestion is to follow the tested canning methods. Always soak and partially cook your beans as directed, then process.
If you have a resource that has tested this method of canning beans from the dry state, I’d sure love to see it because I admit, it would make the process so super easy. I would love to be able to share it. Contact me and send me a link. Please note I would be looking for an official source that has tested this method. Not someone who just has done it successfully. Problems may not always arise… but when they do it can be serious. So no anecdotes ok?
How do I use a Water Bath canner for my dried beans?
I’ve been asked how to can dry beans the “old fashioned way” Meaning with a water bath canner. I do NOT recommend canning beans or any vegetable or meat without a pressure canner. I do not have any information regarding “old fashioned” methods.
If you are not sure why, I recommend you read my section on botulism and canning safety.
Food safety is a very important part of canning. I simply can’t recommend something that I would not do myself.
However, Another way to use dried beans is this pickled 3 bean salad. Since this is pickled… you can use a water bath!
Printable Recipe Card.
Please don’t forget all the notes and tips on the rest of this page too!
Canning Dried Beans
Equipment
Ingredients
- Dried Beans or peas, of your choice
- Canning Salt optional
- Water
Instructions
Pre-Soak Beans -2 methods to choose from
- Over Night Soak – Check your beans for any small bits of rock, dirt or bad beans. Place sorted and washed beans in a large pot and cover with several inches of water. Soak 12 to 18 hours in a cool place. Drain water and continue with canning directions.
- Quick Soak – Check your beans for any small bits of rock, dirt or bad beans. Simply cover sorted and washed beans with boiling water in a saucepan. Boil 2 minutes, remove from heat, soak 1 hour. Drain water and continue with canning directions.
Canning Directions
- Start by preparing your jars and getting water in the canner heating. You want the canner hot, but not boiling, when the jars are ready to be processed. If you are new to using a pressure canner, see this article for full pressure canning instructions. This includes more detailed information and step-by-step instructions on how a pressure canner works.
Hot pack only
- Rinse pre-soaked beans. Put beans back in pot, covering with fresh water.
- Bring beans to a boil. Simmer 30 minutes. Add water as needed to keep beans covered.
- Add salt to jars (1/2 tsp. per pint or 1 tsp. per quart).
- Fill jar with beans to a generous 1- 2 inch headspace.
- Pour cooking water over beans, leaving 1 inch headspace.
- Remove bubbles, wipe the rim clean, and place on seal and ring. Place the jar in the warm canner. Proceed to fill all jars. Process in a pressure canner according to the directions below.
Notes
- 0-1,000 ft – 10 pounds
- 1,001-10,000 ft – 15 pounds
- 0-2,000 ft – 11 pounds
- 2,001-4,000 ft – 12 pounds
- 4,001-6,000 ft – 13 pounds
- 6,001-8,000 ft – 14 pounds
- 8,001-10,000 ft – 15 pounds
Adapted from: The National Center for Home Food Preservation
Easy recipe to use those beans. Baked Beans.
- 2 Quarts Home Canned Pinto Beans (kidney beans works too)
- 1/2 cup molasses
- 2 T brown sugar
- 1/2 tsp salt
- 1/2 tsp pepper
- 1/2 tsp dry mustard
- 1/8 cup ketchup
- 1/2 cup boiling water (more or less as needed)
- 1 T dry minced or chopped onion.
- You can also add canned ground meat, ham, bacon whatever you might have on hand.
Heat all ingredients, simmer for 10 minutes or until heated through.
EASY!
Thanks for your efforts to educate new canners. It is good that you mention using vinegar in the soaking water of your dried beans. The vinegar helps with the reduction of the lectins in all seeds. The vinegar also lowers the PH levels in the water and reduces Phytic acid. Phytic acid causes beans and grains to have less bioavailability, making it hard for all animals to get necessary b vitamins and minerals from those foods. So, it is important to not skip that soaking step with vinegar.
Thank you for this clear information on canning beans. We lost power during Helene & due to food allergies my choices were limited. We are in the process of having more home canning on hand as part of our storm preparedness food stores. Our hurricane season runs right into winter & possible ice storms, so we’re just considering extra storm preparation canning to have on hand from spring-winter. I wouldn’t have thought of beans having a shorter shelf life than some other home canned goods, so will routinely use them down before adding more to the shelves.
I just canned navy beans as per this instruction. I thought I followed as discribed. I did 14 pints. The beans now finished no longer seem to have liquid. Is this ok? What could have happened. I did use a generous 1″ inch head space. Thanks in advance for your help. I love your site and use it for all my canning recipes.
Beans are a bit notorious for soaking up all the liquid. Fill the jar a little lower with the beans, but keep the liquid at the proper headspace level. This gives the jar a little more liquid. Also be sure you don’t over process.
Hi Sharon.
Can you use this same method of canning beans if you want to add smoked ham hocks and a seasoned broth?
You can add dried seasonings as you please. Remember some of them get stronger in the jar. Sage is one that is notorious for getting too strong. However if you want to add ham this is not the recipe for you. I don’t have it posted yet on SC but here is a good recipe that allows for a bit of meat in each jar.
I have several #1 0 cans of different dried beans I want to can them but they are so hard and I just can’t seem to get them to soften up tenough to pressure can them help me if you can
It could be the beans are simply too old. I know beans can be stored a very long time… but the do get old. The old beans have to be soaked or cooked for a long time to soften up.
I have searched but can’t find anything about canning baked beans? My family loves them and it would be nice to just have them on hand ready to eat, kinda like soup! Can you direct me to how to do that?
I don’t have a post about them yet but yes there are recipes. Here are three that I’d recommend. I made the one with the molasses and it was delicious!
i used store bought pork and beans,then i add onion…bell peppers…ketchup…brown sugar…black pepper.then pack into jars and pressure can pints 35 minutes,they are ready to heat and eat anytime.
This sounds like it would be delicious. But it is not how the recipe was tested. I don’t recommend adding your own vegetables. Follow the directions as written and the recipe is shelf stable. Or you can freeze your recipe.
I really love your website! So much information and so easy to follow. I have a question on the canning beans. Can you follow the instructions completely and use the syrup for Boston baked beans instead of the hot water?
What you’d want to do instead is use a tested recipe for baked beans. Check these recipes and see if they would work for you. This opens in a different website…
I’ve been canning dry beans since I was in my 30’s that happens to be over 40 years ago and I have to agree that having those beans in the pantry when I’m in a rush to put supper on the table is great. I season mine with diced ham also. Not a whole ham hock but a bit of ham to flavor the beans. The process time in a Pressure Canner is the same for ham, (meat) as it is for the beans. I also do not soak my beans. I clean them & check for rocks & bad… Read more »
Your information regarding canning dried beans is SUPER! Please advise how a person can remove the ‘gas’ that often accompanies rehydrating dried beans, before canning the beans. It seems to be that this ‘gas’ could cause problems when pressure canning dried/rehydrated beans.
Thank You!
Bonita, I’ll put that on my to-do list. It would be a great addition to this page. I can tell you now that all I do is just what is in the article above. I have no special tricks. I don’t usually have issues with eating beans though. 🙂 There might be some hints I could find.
Sharon, does this guide work for legumes like lentils and mung beans?
Mel, Lentils, and Mung beans are in the legume family but they are different than most beans. They do not require the presoak in regular cooking (they cook much quicker). I’ve done some research and can’t find any definitive answer as to whether they’d be canned the same as other dried beans. I’m assuming they’d be very mushy and the texture might be too thick for safe canning consistency. Since they are so different I would not recommend canning them. If I find information to the contrary I’ll post it, but for now, I err on the side of caution.
Wow, what a great idea. Thank you!
I started pressure canning dried beans last year and love it! Now I can grab a jar or two whenever I need beans. So easy! One of my favorite things to can are pintos. They make the best refried beans.
I just wanted to say that I’ve been canning dried beans for well over 5 years, and I have never
ever soaked them. I clean them, salt them, add water over them. I have never had a bad batch or a batch go bad. I steam pressure them.
Carole I am glad that you have not had any issues yet. Canning them in the manner you do is not the way that the recipe has been tested. It is a risk that is so easy to eliminate I wouldn’t recommend doing it the way you are. I’d recommend soaking and precooking them before you jar them up as the recipe indicates.
Hi Sharon! Thanks so much for sharing the information on bean canning. Would it be safe to include ham or bacon for seasoning in with the beans before processing? Thank you!
Hi Crystal!
Technically, ham and bacon (as well as other cured meats) aren’t considered safe for canning. There are a few tested recipes that include minimal amounts of them, however. For example, this one: https://nchfp.uga.edu/how/can_04/beans_baked.html I hope this helps!
-Rachel (Sharon’s assistant)
Thank you, Rachel!
can you do this in an insta pot that pressure cooks too? also, if I want to take packages of dried beans and store for long term in mason jars, do they need a oxygen absorber in with them since they are already dried? and do I leave the rings on the jar also? thanks
Hi Kat, I suppose you could cook the beans themselves in the Instapot as the cooking process before putting the beans into the jars, but you should NOT process the jars in the pressure cooker to seal them. You will need to process the filled jars in a pressure canner instead. If it is going to be used in a reasonable amount of time, oxygen absorbers and airtight containers are not needed. For long-term storage, oxygen absorbers do help extend their storage time. 🙂 For storing dried beans in the pantry, for example, keep the ring on. For storing jars… Read more »
I love your website and photos but am confused with these canning beans instructions. The directions for soaking and cooking the beans is confusing. Why would we fill the jars with hot water before filling them with beans? Then… Fill jars with beans or peas and cooking water, leaving 1-inch headspace. In this picture you see the level of the beans. I still have not gone back and filled with the liquid. (Why does it say you have not filled with liquid when you are adding beans and water to the jar?) Also no picture of filling the jars with… Read more »
Debbie, I apologize for the time it has taken me to get back to you but… I wanted to be sure and edit the post above and hopefully clarify things. Let me know if my additions above have helped. As far as just soaking and then processing the beans. The way the recipe is written is for partially cooked beans. The processing will finish cooking the beans but they do need to be soaked and partially cooked to start. This is the way the process has been tested.
love the information you put out! I mostly use water bath. I have only used pressure canning once. With your information Ill probably start
Thank you Julie!