DIY Cold Frame
I spent a lovely relaxing morning building a do it yourself cold frame. Spur of the moment idea and I had a blast! I know that is a little weird isn’t it?
It all started because it has been cold lately, but today….. it is beautiful! So I figured I’d go putter around the garden. I walked over by the shed and saw the windows we picked up that someone was giving away.
I also had some cinderblocks and planned on making a couple of beds in our garden area.
The windows + cinderblocks + my desire to plant early with as little fuss as possible = my DIY cold frame.
The free supplies.
Here are the windows laying along a shed out back. My husband picked these up free when someone was giving them away. It looks like a pile of nothing huh?
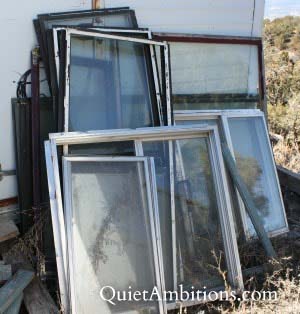
At the time I confess I wondered, What are we going to do with crummy old windows? We have enough junk laying around. Well you never know!
My guy can sniff out deals that seem like nothing… then they always come to a good use. Love that man.
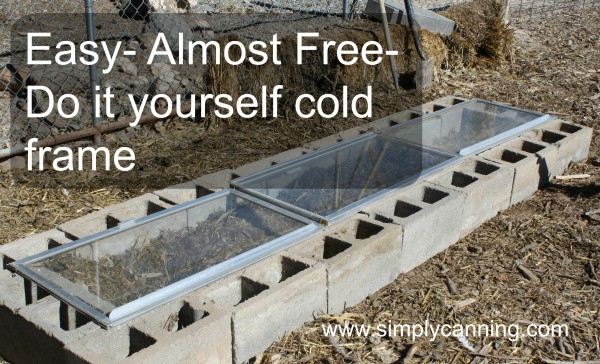
From Cinder block Bed to Cold Frame
I say almost free because we did purchase the cinderblocks… at some point, in the past. They have just been laying around though, not being used.
So I gathered them up and hauled them over to my work area in a wheelbarrow. I decided to make my cinderblock bed the correct size to be able to lay these windows across the top.
I’ve been wanting to build a cold frame to do some early planting, but projects stack up and this one is pretty low on the list. My husband can whip up handy things like this all the time, but me? Well I’m not quite so handy.
However! Stack some cinderblocks and lay a window across the top? I can do that! And I did.
This is an area where I tried some straw bale gardening last year. I tore down my guys old backstop for our archery range to use the bales. The trade off was new bales for my guys.
I had less than satisfactory results planting in the bales so I won’t be doing it again. But the old bales I used had sat there all winter. They were already a bit loose and the chickens had been at them and spread at least one whole bale around this area.
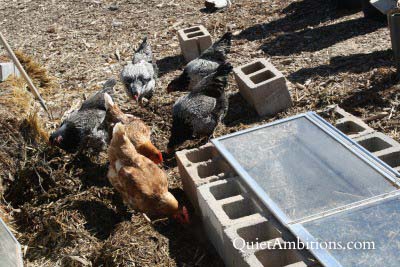
Honestly it felt wonderful to get out in the sunshine and dig around in the dirt. The “girls” (our hens) were helping me too. Whenever we dig around they come looking. Oooo new dirt they seem to say.
Their time in the garden area will soon be coming to an end. They spend the winter in here and then when planting time comes they will go back to the chicken yard. Sad day.
When my husband does this he gets out the level and really makes it nice! Mine I just eyeballed it and it looks pretty good if I do say so myself. Not perfect… but pretty good.
Laying the blocks was the most time consuming part of this project. And it really was not that time consuming. The blocks really need to be level and straight. This entailed a bit of rake work and a tiny bit of shovel work. Nothing major.
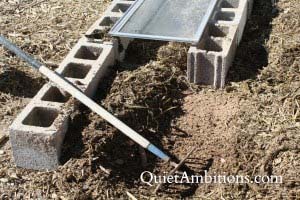
I needed to scrape back that layer of straw that the chickens had spread around. Then loosen some dirt so that I could get my blocks to line up neatly and level. Down on my hands and knees with hands in the dirt is the easiest way to get that ground level. The only way to get the job done. 🙂
When I started scraping away that straw what I found underneath was a thin layer of nice dirt. An inch or two down was our usual hard clay. So if that can happen over one winter, that soil will only get better and better. I tossed the hay back into the cinderblock bed.
I’ll also be adding worm castings from the worm bin I started last summer. And any other amendments I can come up with. I noticed quite a few leaves still laying around from last fall.
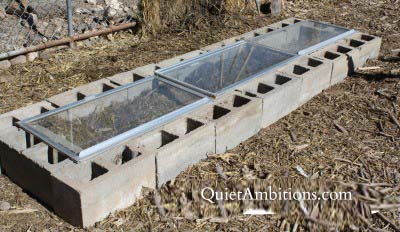
So here is my homemade cold frame. Not bad eh? Better Homes and Gardens it is not. But it will keep my seedlings nice and toasty. In fact I’ll have to be careful they may get too toasty.
I placed a thermometer in the bed when I was done to see what the temperature would come up to. As soon as I put it in I could see it was rising. I checked back after a bit (maybe half an hour?) and the temperature in the frame was 96 degrees.
There was already moisture building up on the glass. I’ll have to watch it close to keep from cooking my plants. Pulling the glass off partially is easy enough. And when it gets to summer time, I’ll pull it off completely and just use it as a garden bed.
For this spring I’m still not sure what I’ll plant in there. I think probably onions. And I have some broccoli and cauliflower seed started in cups that I may just bring out here. We’ll see.
But whatever I do with it, I’m sure it will come in handy.